Dedicated Sentinel + Agent Node
This guide walks you through a minimal distributed Naylence fabric:
- a Sentinel running in its own process (routing + admission/policy boundary)
- a Hello agent running in a separate process, attaching downstream to the sentinel
- a short‑lived Client node that calls the agent by logical address
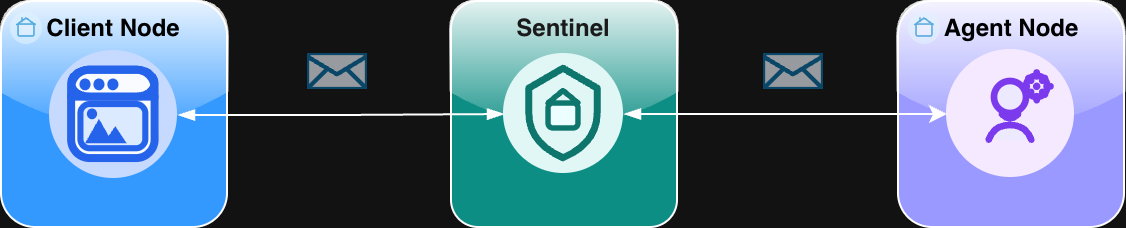
Topology: Dedicated sentinel + agent nodes
Goal: Start a sentinel, attach an agent as a separate node, then send a “Hello, Naylence!” request from a client and see it round‑trip through the sentinel.
Shape
Prerequisites
- Python: Python 3.10+ (recommended) and a terminal
- TypeScript: Node.js 18+ and a terminal
- Git (optional)
A node is a runtime identity in the fabric, not strictly “a process.” You can host multiple nodes in one process (e.g., demos), but this guide uses the common production‑style shape: one process per node.
What changes vs “Agent on Sentinel”
In Agent on Sentinel, your agent runs inside the sentinel node, so it starts with the sentinel’s root config.
In this topology:
- the sentinel is its own long‑running process
- the agent is a separate process and runs with a node config
- both agent and client need to know where to reach the sentinel (via
FAME_DIRECT_ADMISSION_URL) - the client code stays the same: it still calls the agent by logical address (e.g.,
hello@fame.fabric)
Step 1 - Create a project
Create a new folder anywhere:
Example directory layout:
dedicated-sentinel/
  sentinel.py
  agent.py
client.pyStep 2 - Install dependencies
Install the Naylence SDK and a runner for your language.
python3 -m venv .venv

source .venv/bin/activate

pip install naylence-agent-sdkStep 3 - Create and start the sentinel
The sentinel is a long‑running process. It accepts downstream connections (agents) and routes envelopes.
# sentinel.py
import asyncio

from naylence.fame.sentinel import Sentinel
from naylence.agent import configs

if __name__ == "__main__":
    asyncio.run(
        Sentinel.aserve(root_config=configs.SENTINEL_CONFIG, log_level="info")
    )
Run it:
python sentinel.pyBy default the sentinel listens on port 8000. Keep this terminal running.
Step 4 - Create and start the agent as a separate node
This is the key difference in this topology: the agent runs with a node config and attaches to the sentinel downstream.
# agent.py
import asyncio
from typing import Any

from naylence.agent import BaseAgent, configs

AGENT_ADDR = "hello@fame.fabric"

class HelloAgent(BaseAgent):
    async def run_task(self, payload: Any, id: Any) -> Any:
        return payload

if __name__ == "__main__":
    asyncio.run(
        HelloAgent().aserve(
            AGENT_ADDR,
            root_config=configs.NODE_CONFIG,
        )
    )
Run it (new terminal):
source .venv/bin/activate

export FAME_DIRECT_ADMISSION_URL="ws://localhost:8000/fame/v1/attach/ws/downstream"
python agent.pyWhy FAME_DIRECT_ADMISSION_URL here?
Unlike “Agent on Sentinel”, this agent is not hosted by the sentinel process. It must attach to the sentinel, and this env var tells it where to connect.
Step 5 - Create and run the client
The client is a short‑lived process. Notice that this looks the same as in “Agent on Sentinel”: it calls the agent by logical address, and doesn’t care where the agent physically runs.
# client.py
import asyncio

from naylence.fame.core import FameFabric
from naylence.agent import Agent, configs

AGENT_ADDR = "hello@fame.fabric"

async def main():
    async with FameFabric.create(root_config=configs.CLIENT_CONFIG):
        remote = Agent.remote(address=AGENT_ADDR)
        result = await remote.run_task("Hello, Naylence!")
        print(result)

if __name__ == "__main__":
    asyncio.run(main())
Run it (new terminal):
source .venv/bin/activate

export FAME_DIRECT_ADMISSION_URL="ws://localhost:8000/fame/v1/attach/ws/downstream"
python client.pyExpected outcome:
- Client prints the result (an echoed payload).
- Sentinel logs routing activity.
- Agent logs that it handled the request.
Optional steps
- See raw envelope traffic by setting
FAME_SHOW_ENVELOPES=truebefore running any process. - Mix runtimes: run the TS agent with the Python client or vice versa.
- Turn on verbose debugging with
FAME_LOG_LEVEL=debug.
Common issues
- Wrong admission URL: agent/client can’t connect or silently hang. Double‑check the exact
ws://.../attach/ws/downstreampath. - Agent started before sentinel: start the sentinel first.
- Port already in use: something else is bound to
8000. - Duplicate identity (especially when you copy/paste across tabs): one instance can “steal” the route.
References
If you want a working reference implementation (including Docker Compose setups), see:
- Python: hello-with-sentinel (sentinel + agent + client)
- TypeScript: hello-with-sentinel (sentinel + agent + client)
(These are references only — this guide is designed to be followed from scratch without cloning.)