Browser Client
This guide walks you through a variation of the Agent on Sentinel topology where the client is a browser-based application:
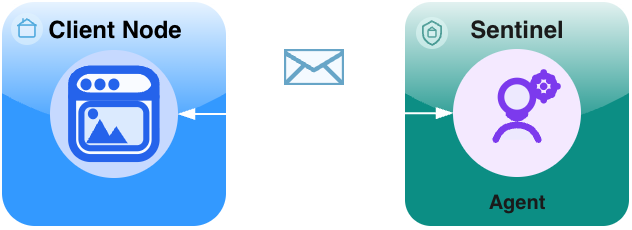
- a Browser Client (Pure JavaScript)
- a Sentinel (routing + admission/policy boundary)
- a tiny Hello agent that runs directly on the sentinel
Topology: Browser Client -> Agent on Sentinel Goal: Send a “Hello, Naylence!” request from a web page and see an agent (reachable via the sentinel) handle it and reply.
Shape
Prerequisites
- Node.js and npm installed (to run the development server)
- You’ve completed a language quickstart:
Step 1 - Create a project
Create a new folder for your project:
mkdir browser-client-demo
cd browser-client-demo
Initialize a new npm project:
npm init -yStep 2 - Install dependencies
We will use Vite for the development server and install the Naylence SDKs.
npm install vite @naylence/agent-sdkStep 3 - Create and start the agent on the sentinel
The sentinel is a long-running process. It accepts downstream connections (agents) and routes envelopes.
# agent.py
import asyncio

from typing import Any
from naylence.agent import BaseAgent, configs

AGENT_ADDR = "echo@fame.fabric"

class EchoAgent(BaseAgent):
    async def run_task(self, payload: Any, id: Any) -> Any:
        return payload


if __name__ == "__main__":
    asyncio.run(
        EchoAgent().aserve(
            AGENT_ADDR, root_config=configs.SENTINEL_CONFIG
        )
    )
Run it:
# Assuming you have naylence-agent-sdk installed in a venv
python agent.pyBy default the sentinel listens on port 8000. Keep this terminal running.
Step 4 - Create the Browser Client
Create an index.html file. This file sets up a simple UI and configures the admission URL via a global variable.
<!-- index.html -->
<!doctype html>
<html lang="en">
  <head>
    <meta charset="utf-8" />
    <meta name="viewport" content="width=device-width, initial-scale=1" />
    <title>Naylence Hello — Simple Browser Client</title>
    <script>
      // Configure the admission URL for the browser client
      window.__ENV__ = {
          FAME_DIRECT_ADMISSION_URL: "ws://localhost:8000/fame/v1/attach/ws/downstream",
      };
    </script>
  </head>
  <body>
    <h1>Naylence Hello (Simple)</h1>

    <div>
      <input type="text" id="messageInput" placeholder="Enter message" value="Hello World">
      <button id="sendButton">Send Echo</button>
    </div>

    <div>
      <span id="result">—</span>
    </div>

    <script type="module" src="/main.js"></script>
  </body>
</html>
Create a main.js file. This contains the logic to connect to the fabric and send a request.
// main.js
import { withFabric } from "@naylence/core";
import { Agent, CLIENT_CONFIG } from "@naylence/agent-sdk";

const AGENT_ADDR = "echo@fame.fabric";

// UI Elements
const messageInput = document.getElementById("messageInput");
const sendButton = document.getElementById("sendButton");
const resultEl = document.getElementById("result");

async function main() {
  // Handle Button Click
  sendButton.addEventListener("click", async () => {
    const text = messageInput.value;
    if (!text) return;

    resultEl.textContent = "Sending...";
    sendButton.disabled = true;

    try {
      // Connect to the fabric using the configuration
      await withFabric({rootConfig: CLIENT_CONFIG}, async (fabric) => {
        const agent = Agent.remoteByAddress(AGENT_ADDR);

        // Send the request to the agent
        const response = await agent.runTask(text);
        resultEl.textContent = response;
      });
    } catch (err) {
      console.error("Error sending message:", err);
      resultEl.textContent = "Error: " + err.message;
    } finally {
      sendButton.disabled = false;
    }
  });
}

main();
Step 5 - Run the Client
Start the Vite development server:
npx viteOpen the URL shown in the terminal (usually http://localhost:5173).
- Enter a message in the input box.
- Click Send Echo.
- You should see the echoed message appear below the button.
Check your sentinel terminal; you should see logs indicating the request was handled.
Optional steps
- React Integration: For more sophisticated examples using React, check out the Naylence React examples . The
@naylence/reactlibrary provides hooks and components to make building React applications with Naylence easier.